Showing posts with label pullover top. Show all posts

Sunday, June 2, 2013

Yet another pullover top

 Once again, my trusty pullover top pattern has had another go around.  I made one for C for her birthday.  I even managed to get the sleeves out of the bottom of my jersey sleeves - totally hemming free top.

I used the tutorial from Made to add the pink around the neckline, but instead of cotton ribbing, I used some merino offcuts.  When I made this top for J, I found that the cotton rib was too heavy for the merino of the top, and it didn't sit quite right.  It also took much longer than the rest of the top to dry, so I figured that I could apply the same principle with the merino instead.

I really like the way it turned out.
I embellished the top with a couple of little merino stars as well.  I was a bit worried it would look too Christmassy (the top is much more green than the pictures look, the top one is the closest to the colour), but I think I've gotten away with it.

This is really the pattern that keeps on giving - quick, easy and really satisfying.  What's your favourite go to pattern?

Saturday, June 1, 2013

UFO week

No, I'm not searching the sky (although we've had so much rain lately that I wouldn't see much anyway).  I'm  trying once again to tame my unruly pile of unfinished objects.
 I need to complete a top for C's birthday

A faux chenille blanket

And *cough* an advent calendar.

More on the one I've already completed in another post.

Monday, July 4, 2011

Birthday top

I made J a pullover top for her birthday this week,and I am very pleased with my efforts.  Its the first time I successfully used the overlocker I was so kindly lent - well apart from breaking a (hopefully) non essential bit of it.  I know everyone raves about how much faster using an overlocker is, and I am totally sold.  It was so fast and easy.
My mother will be less than impressed when she sees that I have just overlocked the sleeves, rather than hemmed them.  I've mentioned before that I don't like hemming, right?

There was a lovely pattern running through the front of the jersey that I used to make J's top so I incorporated it into her top.
I also found a lovely wooden vehicle puzzle, that I am sure she will adore, from the Hospice Shop.  And here are the presents, all wrapped up with love and care by her big sister (who decided that I also needed a present and proceeded to wrap up my hairbrush for me - and I had to wait until she was ready to unwrap it.)

Friday, July 1, 2011

General upcycling tips

I make most of P and J's clothes from recycled materials.  Some really good sources are woollen jerseys (especially merino), t shirts, pillow cases and sheets.  They are cheap, you know what you're getting, and they contain quite alot of material.  So I thought I would put together a little list of tips to get the most out of your upcycled garments.

I find it easier to place my patterns if I cut up the seams first.  It makes it a little easier for the fabric to lie flat.  Just make sure that you don't need the seams in your finished garment.

Put your pattern right to the bottom of your garment, its a ready made hem.  Your finished item will be slightly longer, but you won't have to hem it (and really, who likes hemming anyway?)

If your garment has some special motif or pattern that you want to include, place your pattern pieces carefully, to make sure you can get it into the finished item.

Sometimes preloved garments don't always sit as perfectly as new material would.  You can try pulling it gently into a squarer shape (carpet or microfleece is quite good for 'sticking' to other material).  Or you can just line up your pattern pieces as best you can.  The jersey above has quite a large rib section at the bottom, which naturally pulls in.  I don't mind if the finished top also pulls in at the bottom.

 I don't pin my pattern pieces to my material, I just use weights.  And you don't need fancy sewing weights either, small cans of food, puzzle pieces or your children's wooden toys work just as well.

 When making a top from a larger top, its a good idea to take the body from the body, and the sleeves from the sleeves.  It means that you can be sure the grain of the fabric will be going the right way.

 If you can get the sleeve pattern piece to fit at the end of the garment sleeve, you can eliminate hemming these as well - but it generally only works with short sleeve garments.  Think really carefully about where you cut sleeves, as there is quite alot of fabric in a sleeve (I usually cut the underarm seam and lie it flat) that can be used for other things.  I managed to get a sleeve for the top I'm making, and a baby hat from the two sleeves of the jersey.

A size 2 top for J, and a baby hat from one smallish woman's jersey.

With a little bit left over to felt or use for little woollen dolls.

I hope these tips are helpful.  Let me know if you have any other questions, or have some tips of your own to share.

Wednesday, September 8, 2010

Smockets

I've been thinking about a top pattern for P for a while.  Although the pullover top is fantastic, its only a size two, and even if I upsized the pattern, I think the neckline is a little babyish as P gets older.  Then I saw these smockets and thought they looked like a great idea.  I also had the pleasure of seeing a couple of Sam's smockets in real life, and they are just lovely, and the versatility of them really appeals to me, I can do some with wool for winter wear and lighter weight cottons for summer, and everything in between.  Now, to find the time to make some.

Friday, August 27, 2010

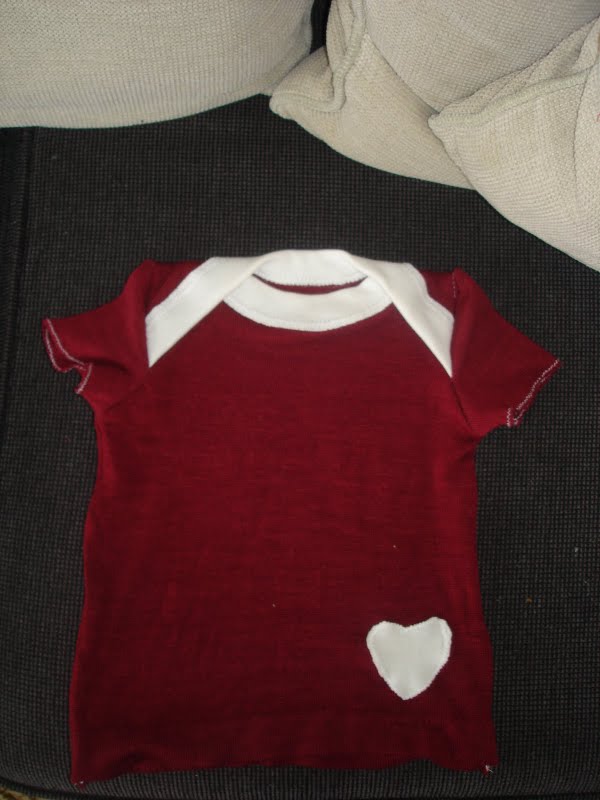
And finally, because I have managed to do an amazing amount of sewing this week, I also made a top for J for Christmas as well.

I was going to make J another crossover top with a merino jersey that I cut down, but I decided to do this pattern instead.  I've made a few of these for P and it is just such a handy top.  It can be worn on its own in spring or autumn - or even cool summer day - and it can be layered under or over other tops in winter.

I got the idea for the ribbing from this tutorial and because I had some around the neck line I decided to appliqué on a little heart as well.  I used one of my biscuit cutters for the heart shape.  My top has slightly different sewing up instructions than the 90minute one, but its pretty much the same in all other respects.  I used the bottom of the jersey so I didn't have to hem it - it also makes the top a bit longer which is nice, because both my girls are tall for their age.  Instead of hemming the sleeves, which I always find a pain, I just did a tight zigzag in the white thread to match the ribbing.  This week was definitely a success.

Sunday, October 4, 2009


I'm due with my second child at the beginning of December, and I think I have spent the last 7 months nesting. I've been frantically sewing clothes for P, my daughter for Christmas presents.
My mother in law gave me a bag full of scraps of fabric and it included some with elephants on it. P's all time favourite animal is the elephant. Anytime we turn the computer on, she demands to see elephant photos on it so I thought that the elephant would make a perfect applique for my one and only top pattern. Its the first time I'd ever appliqued anything, and I'm really happy with how it turned out. I backed the elephant picture with fusible interfacing, and then did a really tight zigzag stitch all the way around it. Its not quite straight but I don't think P will mind. I actually had some trouble putting it away for Christmas since I'm sure she'll love it.
Related Posts Plugin for WordPress, Blogger...