Sunday, July 31, 2011

Pay it forward finished objects

Since my pay it forward gifts have been received I thought I had better reveal exactly what they are.  For Rhiannon from Remarkable Junque I made a labyrinth.  I found the instructions here.  Don't be put off by the list of materials, I didn't use the chalk or fabric adhesive.  I just drew lightly with a pen, and pinned the three layers of fabric together, and it worked fine.  I didn't bind the edges of the labyrinth, so that Rhiannon would be able to use it in any way she wanted to. 


For Heather at Over the top originals, I dyed some wool for her.  P was very insistent that it be yellow.  I was a little concerned, since yellow can be a bit divisive, but I'm so glad I did dye it this colour.  It came out so sunny and buttery that I almost didn't give it away.  Hopefully she finds some project for it.

The base wool is a 12ply from the Hospice Shop, and its really warm and hard wearing.
Special guest appearance by my work desk.

Tuesday, July 26, 2011

Steiner style toys

It occurred to me that it might be a good idea to explain a little bit about what Steiner toys actually are.  In a word, gnomes.
Image courtesy of Growmama

Like this,
Image courtesy of Growmama
And this
Image courtesy of Chocolate Eyes
And these
Of course, thats not the only thing that Steiner or Waldorf toys can be, but it is the most easily recognisable form that these kinds of toys take.  There are a couple of really important factors that make something Steiner.  The first is that they are in some respects 'formless'.  
Image courtesy of Growmama
Steiner style toys generally have either no faces, or only minimal facial features.  I have to say that when I first started seeing these kinds of toys, I found the lack of faces a bit creepy.  I initially found them a bit empty looking, and found it a little disturbing.  Their faces are empty on purpose though.
The idea is that if there are no facial features, then children are free to express a full range of emotions and ideas through their toys without being constrained - or prompted - by any expression already on the toys face.  Steiner philosophy is all about the freedom of imaginative play.  And now that I am used to looking at these kinds of toys, I don't find them creepy at all, and P and J don't find it at all strange that their baby dolls don't have faces.

Image courtesy of Growmama
Another really strong feature in Steiner inspired toys is the use of natural materials.  Wool, especially wool roving and felt feature highly.
Image courtesy of Chocolate Eyes
Wood is another classic Steiner material.  But don't feel that you absolutely have to use natural materials, I used some polyester stuffing for my baby dolls, because its all I had on hand.

If you're looking for some inspiring Steiner blogs, here are a few to check out:


  • Natural Suburbia - if you only check out one blog, then this is a good one.  Linda blogs about homeschooling her kids, her wonderful knitting patterns and be sure to check out her Creative Friday series.
  • Growmama is a lovely Steiner focussed kiwi blog.  Anissa is also currently running a series on creative mamas.
  • Chocolate Eyes - this is a great Steiner blog, and there are some lovely wooden toys here, as well as a fantastic tutorial on how to make them
  • Rhythm and Rhyme - I talked about this blog in my baby doll post
  • The Little Gnomes Home - this is another Australian Steiner inspired blog, with some really thought provoking posts.

Baby dolls

So I made some little Steiner inspired toys this week, and it was really fun and easy.  I decided not to make the Waldorf Doll that I won from Julia because I was worried that it would be too involved and I would get all stressed out by it.  It looks really easy in the pattern instructions, but I suspect that I will actually find it a bit harder when I go to sew it.  Instead, I tackled this lovely baby doll pattern from Rhythm and Rhyme.  It was really fast and easy to make, and P and J adore their babies.  I used some left over wool from jerseys that I have cut up to make clothes out of, and its a great way to use those smaller scraps of material.

Instead of the pointy hats in the tutorial, I made mine long tubes and then sewed the edges together (more on how to do this in a further post).  I also decided not to sew the hats onto the babies heads, since they are for P and J, rather than smaller children.  This proved to be a very good idea, because they love to take the hats off and put them back on.  In fact, P has requested that I make more clothes for them.


Notice the little blurry foot in the picture, I struggled to take any photos without little ones trying to grab their babies and run off.

Monday, July 25, 2011

Cultural Swap


A little while ago I signed up for this awesome cultural swap that Melissa is hosting over at Chasing Cheerios.  I was so excited to be able to take part in this.  Essentially I will send out 12 envelopes with information about our lives, our town, and New Zealand in general, and I'll get 12 envelopes back.  I'll keep them all and bring them out one a month next year.

Its such a fabulous idea.  My plan is to get a map of the world for P for Christmas, and we'll mark on it where we get the envelopes from.  I also want to get some continent bags so that I can add in all the interesting trinkets we get.

So my project this week is to get my envelopes together.  The contents will probably include:


  • Some sand from our beach (its black sand so fairly unusual)
  • Some NZ coins
  • Instructions and materials on how to make a poi (look out for a guest post from my friend Kirsty)
  • Some other little NZ trinkets
  • A vocab card with some common Maori words/phrases
  • Photos - of our house, the Mountain and our bike rides.
Such an exciting project, I can't wait to get started on this one.

Tuesday, July 19, 2011

Dolls clothes

I was all set to write a post about how I didn't manage to achieve anything last week.  DH has started a new job and its thrown out our routine so its taking a little while to adjust.  Of course J also decided that this was a great time to get her eye teeth, which culminated in a 4.30am start to the day on Saturday.

However, we got out some material, and P got all inspired.  So we made a smock for Kiki*.  It was a great little project, all it took was a little pattern drafting and some sewing
.

I think I will be making some more of these kinds of clothes for Christmas presents, its a great way to use up some of the smaller scraps of fabric.

*In case you're wondering about Kiki's name, P came up with it out of the blue (its pronounced Kicky).  She also has an imaginary friend called Key.

Steiner Toys

My project this week is to create some Steiner inspired toys.  I've blogged previously about Montessori style activities, and the girls have really enjoyed them.  But I've also previously blogged about how my philosophical style leans more to Steiner inspired preschool activities so I decided I would focus on these kinds of toys this week.

And its a really good time to mention that I won a giveaway! I won a tutorial to make a wonderful waldorf doll through the Rhythm of the Home blog.  I'm very excited about the opportunity to make such a wonderful doll, and it looks so easy (famous last words).

Monday, July 11, 2011

Advent Calendar

Yes, that's my project this week.  No, don't freak out it is still July, but I wanted to make one of these last year and just ran out of time.  So I thought I would get onto it really early this year.   I really like the idea of this calendar, that the girls will hang an ornament on the tree everyday until Christmas.  I don't really like the idea of them getting presents every day, or chocolates so this seems like a really fun alternative.

Pay it forward giveaway

I'm sure you're all dying to know what my pay it forward handmade gifts are.  And I'm really excited to send them out.  But you'll all have to wait to see the finished products, since the recipients haven't got them yet.

But I thought you could all do with a sneak peek.  
For recipient number 1

For recipient number 2.

Now you may notice there are only two pictures here.  That's because I hit a bit of a mental block with recipient number 3.  So she may have to wait a little while longer.  I'm sorry about that, but hopefully inspiration will hit and I'll have something to give in the near future.

Monday, July 4, 2011

Birthday top

I made J a pullover top for her birthday this week,and I am very pleased with my efforts.  Its the first time I successfully used the overlocker I was so kindly lent - well apart from breaking a (hopefully) non essential bit of it.  I know everyone raves about how much faster using an overlocker is, and I am totally sold.  It was so fast and easy.
My mother will be less than impressed when she sees that I have just overlocked the sleeves, rather than hemmed them.  I've mentioned before that I don't like hemming, right?

There was a lovely pattern running through the front of the jersey that I used to make J's top so I incorporated it into her top.
I also found a lovely wooden vehicle puzzle, that I am sure she will adore, from the Hospice Shop.  And here are the presents, all wrapped up with love and care by her big sister (who decided that I also needed a present and proceeded to wrap up my hairbrush for me - and I had to wait until she was ready to unwrap it.)

Pay it forward

Back in the beginning of the year, I joined Pay it forward.  And the time has come for me to make good on my promises.  So this week I will be sending out some little handmade goodness.

If you'd like to join in, please feel free to leave a comment in the original Pay it forward post.  I'll try my very best to complete everything this week.

Friday, July 1, 2011

General upcycling tips

I make most of P and J's clothes from recycled materials.  Some really good sources are woollen jerseys (especially merino), t shirts, pillow cases and sheets.  They are cheap, you know what you're getting, and they contain quite alot of material.  So I thought I would put together a little list of tips to get the most out of your upcycled garments.

I find it easier to place my patterns if I cut up the seams first.  It makes it a little easier for the fabric to lie flat.  Just make sure that you don't need the seams in your finished garment.

Put your pattern right to the bottom of your garment, its a ready made hem.  Your finished item will be slightly longer, but you won't have to hem it (and really, who likes hemming anyway?)

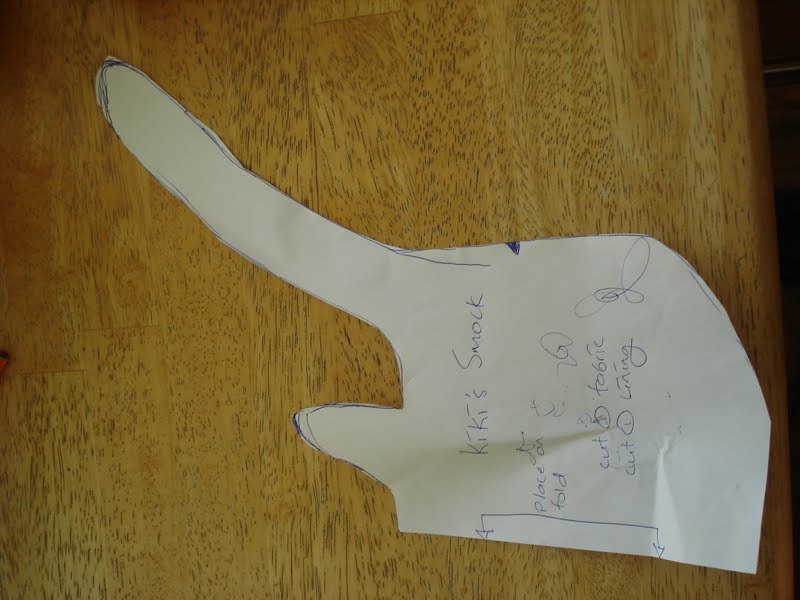
If your garment has some special motif or pattern that you want to include, place your pattern pieces carefully, to make sure you can get it into the finished item.

Sometimes preloved garments don't always sit as perfectly as new material would.  You can try pulling it gently into a squarer shape (carpet or microfleece is quite good for 'sticking' to other material).  Or you can just line up your pattern pieces as best you can.  The jersey above has quite a large rib section at the bottom, which naturally pulls in.  I don't mind if the finished top also pulls in at the bottom.

 I don't pin my pattern pieces to my material, I just use weights.  And you don't need fancy sewing weights either, small cans of food, puzzle pieces or your children's wooden toys work just as well.

 When making a top from a larger top, its a good idea to take the body from the body, and the sleeves from the sleeves.  It means that you can be sure the grain of the fabric will be going the right way.

 If you can get the sleeve pattern piece to fit at the end of the garment sleeve, you can eliminate hemming these as well - but it generally only works with short sleeve garments.  Think really carefully about where you cut sleeves, as there is quite alot of fabric in a sleeve (I usually cut the underarm seam and lie it flat) that can be used for other things.  I managed to get a sleeve for the top I'm making, and a baby hat from the two sleeves of the jersey.

A size 2 top for J, and a baby hat from one smallish woman's jersey.

With a little bit left over to felt or use for little woollen dolls.

I hope these tips are helpful.  Let me know if you have any other questions, or have some tips of your own to share.
Related Posts Plugin for WordPress, Blogger...