Showing posts with label yarn dying. Show all posts

Sunday, September 8, 2013

Change of plans

My project for the week coming was supposed to be photos.  See I had big plans to put together a photo book, or at least print out photos from our holiday.  We went skiing this week, the first time for the girls.  But unfortunately P was (and still is) very sick.  So there was no skiing for her at all, and not much else either, well except for sleeping on the couch.  So instead this week I need to really get moving on J's birthday presents since I have done *ahem* nothing for them yet.

So that is my project for this week.  I think I will be dyeing some wool, and making some Barbie clothes.

Friday, July 26, 2013

More overdying

Some time ago, I was given a vest that I over dyed.  It came out great, and J continues to wear it happily.  So when I came across this vest (also given to me by the same lovely woman) and saw the marks on the front of it, I realised that I should try over dying this one as well.

In consultation with J, we decided to dye it pink.  Given it was this light purple colour initially, I didn't want to make it too murky by trying to overdye it another purple, and I wasn't sure exactly what would happen if I used a blue dye over it.  So off to the supermarket for some pink food colouring it was.

I soaked the vest in some cold water with at least a cup of white vinegar in it (sorry, no photo of this step, but if you look through my blog at other photos of me soaking wool and wool garments, it looked exactly like those).

I then put it in the slow cooker with some of the soaking water, a bit more vinegar and some hot water to bring it up to temperature.  It is essentially the same process as dyeing wool.

I added lots of pink food colouring (because its actually pretty weak as far as dyes go), and voila, a pretty pink vest with no sign of the marks that were on the front of it.
The only downside to overdying a finished garment is the splotchiness of the dyeing process.  Where you do it with yarn, the act of knitting will redistribute the colours of the dye.  But with this, you do end up with some large dye patches on the finished product.  
I'm still really happy with it, and it has turned a stained top into a not stained top, so its definitely worth giving a go.

Have you overdyed anything? Or managed to remove stains or repurpose a garment before?

Thursday, October 25, 2012

A present for my Mum

or dyeing wool, with pictures.

Materials
Wool
Food colouring (mine is from the supermarket)
Slow cooker
White vinegar

My base wool.  I bought a whole bag of mystery ply wool from the Hospice Shop a little while ago.  As you can see from the kinks in the wool, it was obviously from another project that has been frogged.  I had about 150g of it left, and it is most likely 4 ply.

First I skeined it around two chairs.  It pays to make this a bit bigger than you want a finished skein of wool to be, I'll explain why later.  Of course if you have some kind of fancy wool windery thing you could use that.  You can just see J's hands in the top of the photo threatening to cut things with scissors.

 I soaked the wool in a bucket of water with about 1/2 a cup of vinegar added.  I like to soak overnight, but a couple of hours will also do.

Then I dumped it into the slow cooker with some of the soaking water, some warm water, and another 3/4C of vinegar.  If you're mixing dyes, it pays to go easy on the vinegar, as more than 3/4C can make the dyes split, and you can get some unintended variegations.

Leave it in the slow cooker (with the lid on) until the water starts to steam - its a good idea to start with fairly warm water, otherwise this takes forever.  Don't use boiling water though, it might felt the wool.

Because my base was grey (and I knew from past experience with the yarn that it didn't take up dye all that well), I decided to go with a greyish blueish colour.


I mixed my dye together in a little container.


I then dumped all the dye into the slow cooker and poked it around so that all the wool got some.  I turned it down to low, and then turned it off and left the wool in the slow cooker overnight - you don't have to leave it this long, just until the water is clear.  But I knew that my wool may take a long time to soak up all the dye, and I didn't need the slow cooker for anything else.

I rinsed and then hung the wool up to dry.

Notice the interesting purple I got from my food colouring.  If you're looking for a really specific colour or combination with your dyeing, this method is not for you, its all a bit random.

Remember I said to make your skein a little big initially? Sometimes when the yarn comes out of the slow cooker, it looks blotchy - all the colour on a few patches.

It will always look better if you reskein it once its dry.  It just distributes the variegations better in the yarn.
 And there you have it.  Beautiful hand dyed yarn.

My Mum loved it, and I can't wait to see what she knits out of it.

Tuesday, October 16, 2012

Present progress

I'm dyeing some wool for my Mum's birthday, its going to look great.


Sunday, May 20, 2012

A small koha

 I know a lovely lady who has chosen to do something pretty extraordinary for a couple struggling with infertility.  Unfortunately things aren't all that smooth sailing at the moment so a bunch of us have got together to give her some gifts, to show how much we respect her and the decision she has made.
My contribution is 200g 8 ply wool.  I dyed it in my slow cooker using green and pink food colouring.  Its a little muddier than I would have preferred, but I'm happy with it, and I really hope that she likes it too.

Friday, November 18, 2011

Over dying

My lovely friend Nyree gave me some clothes that her daughter had outgrown.  They were 'kindy' clothes, stained, but still very wearable.  P couldn't care less about stains on her clothes and was just super excited to have some new things.  One of the tops that Nyree gave me was this lovely hand knitted vest.  It had a green paint stain across the front.  I gave it a go with some sunlight soap, but it didn't shift.

 Then I had a fabulous idea.  I decided to overdye it.  This is exactly the same process as for wool, but using the finished garment.  I used the same process as I do for dying wool.

I chose a purple colour because I thought it would cover the green the best, while still being true to the base colour of the vest.
 Unfortunately, Murphy's law meant that when I dyed the vest, I managed to miss some of the green stain when I put the purple dye in.  Still its much less visible than it was before.

Also Murphy's law is that I prefer the colour on the back to that of the front.

Check out more creativity over at Natural Surburbia.

Sunday, July 31, 2011

Pay it forward finished objects

Since my pay it forward gifts have been received I thought I had better reveal exactly what they are.  For Rhiannon from Remarkable Junque I made a labyrinth.  I found the instructions here.  Don't be put off by the list of materials, I didn't use the chalk or fabric adhesive.  I just drew lightly with a pen, and pinned the three layers of fabric together, and it worked fine.  I didn't bind the edges of the labyrinth, so that Rhiannon would be able to use it in any way she wanted to. 


For Heather at Over the top originals, I dyed some wool for her.  P was very insistent that it be yellow.  I was a little concerned, since yellow can be a bit divisive, but I'm so glad I did dye it this colour.  It came out so sunny and buttery that I almost didn't give it away.  Hopefully she finds some project for it.

The base wool is a 12ply from the Hospice Shop, and its really warm and hard wearing.
Special guest appearance by my work desk.

Wednesday, August 18, 2010

More knitting

I took part in a yarn swap several months ago and I received this gorgeous yarn from my swappee. The theme of the swap was "I love you", and all participants had three words that had something to do with love to use as inspiration for the swap. The word my swappee used was "Aotearoa". The wool is entitled "misty morning" and I also received a lovely tuatara puzzle for P with it. At first glance the wool seemed to be semi solid, but actually there were several different colours that all complemented each other really well - greens and browns.
I decided to knit this cardigan (you need to log into Ravelry), and it was as fast and easy as the pattern promised. The bottom is knitted in one piece, with the moss stitch border done at the same time. I love the way the wool knitted up - not always a given with variegated wool. The only problem I found was the decreases on the raglan sleeves. Because I'm left handed, the decreases at the beginning of the row didn't match the ones at the end, so when I joined it they weren't the same. This bothers me because I like everything to be 'right'.Notice the incredible brown carpet in our living room - its awesome!
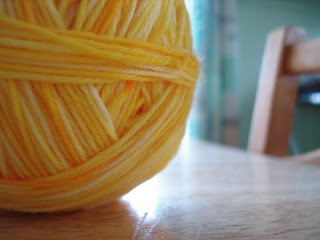
A while ago I dyed some 4ply baby merino to knit some little vests for my friend who was having a baby. She didn't know what she was having, and I thought about knitting them up in white and then overdying them once she had the baby, but I wasn't sure it would look any good. So instead I used my trusty slow cooker technique. I used yellow food colouring and the wool came out looking amazing.
I then knitted up two little vests/singlets. The pattern is my own, based on a very simple rectangle shape. However, I didn't write down the variation that I created, so when I come to knit it again, I'm going to have to recreate it from memory.

My friend loved them because she had a winter baby and they were great to layer over other outfits. Its definitely a great option if you're looking to knit for a winter baby because they get heaps of wear out of them - they work in almost any weather, and are nice and easy to get on a newborn.

See, knitting and blogging - my project is going great guns.

Wednesday, November 18, 2009


I bought a bag of wool from my local op shop, around 1kg for $6, which was too good a deal to pass up. However, there were no labels and it was all just wound in balls. But I figured it was probably wool, and being a light grey, I could dye it. So I set about dyeing about 300g of it green using food colouring.

I used the first method described here. I love using my slow cooker to dye wool because it is super super easy, but its not really a method for getting exact colours. If you have a very clear idea of how you want your yarn to look once its dyed, this method is probably not for you. I'm much more of a 'throw it in the slow cooker and see what happens' kind of girl so its great for me. Initially I had wanted a darker green than I got, and I was a little disappointed with the wool when it came out of the slow cooker. But as it dried I got more and more excited about it, and now I'm sold on the colour. I've got another 100g soaking so that I can dye it a light blue/purple so we'll see how that goes with the green.
Related Posts Plugin for WordPress, Blogger...